
News & Events

How To Cap Off a Water Pipe With Seal Caps
Leaks and water damage can negatively affect the structural integrity of residential and commercial properties. Capping off a water pipe requires precision and the right tools to seal leaks and prevent future complications that may arise in the plumbing system. Read this step-by-step process for capping off a water pipe with seal caps.
Why Capping Off Water Pipes Matters
Improperly sealed water pipes leak, lose water pressure, and cause structural damage to a property. A plastic seal cap closes off the pipe from environmental factors, such as moisture and debris, without compromising the functionality of the pipe itself.
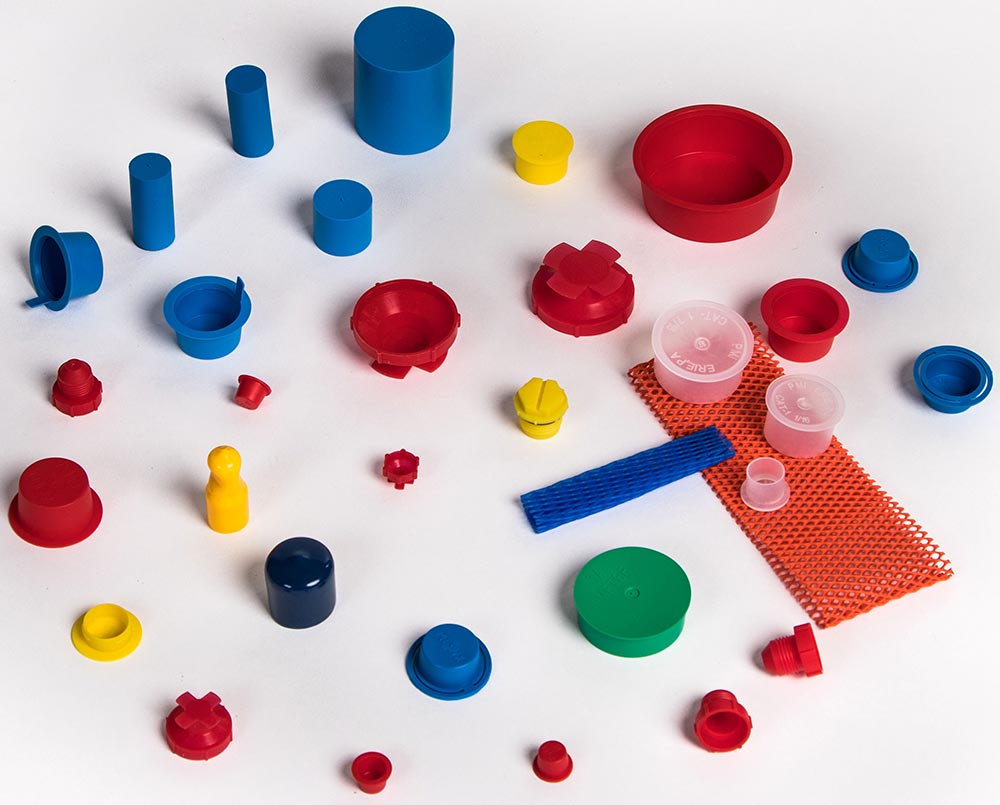
The Advantages of Using Plastic Seal Caps
Plastic seal caps stand out from other sealing methods due to their adaptability, resilience, and ease of use. These devices are lightweight yet durable, which prevents corrosion or degradation despite prolonged contact with water.
Additionally, they fit pipes of varying sizes tightly and offer excellent protection against leaks or external intrusion. You can pick from a wide range of sizes to seal off any pipe you come across during your plumbing service. The cost-effectiveness of plastic seal caps also makes them useful for large-scale plumbing or manufacturing projects.
Why Plastic Seal Caps Are Ideal for Plumbing Projects
Many manufacturers, including Polymer Molding, design plastic seal caps for safe, efficient installation. Their smooth interior prevents damage to the pipe ends, and the seal is secure. They are indispensable components in professional plumbing services and manufacturing settings requiring temporary or long-term sealing.
Preparing for the Installation of Plastic Seal Caps
For a successful installation, prepare the area and determine what kind of materials you’ll need to get the job done. Proper tools, thorough inspections, and correct measurements prevent errors or inefficiencies during installation.
Inspecting the Pipe and Worksite
Start by examining the pipe for preexisting damage or structural wear. Check for residual moisture in the pipe, as water can hinder the adhesion and fit of the plastic seal cap. If you notice residue, wipe it thoroughly to guarantee a secure closure.
Next, assess the workspace around the plumbing system. Make sure the surrounding area allows safe, unrestricted movement during the installation process, where you can have all the necessary tools within reach.
Essential Tools for the Job
To install a plastic seal cap, you’ll need a pipe cutter, cleaning solutions to remove dirt or rust, and the appropriate-sized seal cap for the pipe you intend to close off. Always verify that the dimensions of the seal cap match the pipe diameter for a snug fit.
Step-by-Step Guide to Capping Off a Water Pipe with Plastic Seal Caps
Once you have the materials, it’s time to cap off the water pipe with seal caps. Errors could lead to a leak or burst pipes, so follow this guide carefully.
Cutting the Pipe to the Correct Length
Begin by cutting the pipe so the edge remains smooth and clean. A jagged edge could compromise the seal and lead to water leakage or pressure issues over time. For the best results, use high-quality pipe cutters.
Position the cutter perpendicularly around the pipe’s circumference and rotate it gradually. Apply light pressure to achieve an even cut. Once complete, inspect the edge for irregularities before moving to the next step.
Cleaning and Preparing the Pipe for Sealing
The quality of the seal depends on the cleanliness of the surface. Use a plumbing cleaning solution to remove dust, rust, or grease that might impede the seal cap’s grip.
Allow the pipe to dry entirely before attaching the cap. This creates an adhesive-free, friction-based fit that locks the cap securely into place. If moisture remains inside the pipe, it can lead to future seal failures, so check the surface thoroughly before attaching the plastic seal cap.
Attaching the Plastic Seal Cap
Before working on this project, you should have measured the area to find the best fit. Even a slight mismatch can negatively affect the integrity of the seal and cause leaks or pressure buildup. Selecting a universal-fit cap from reputable manufacturers narrows the margin of error.
Place the plastic seal cap firmly over the prepared pipe end. Gradually apply pressure until the cap clicks or slides naturally into its locking position. Verify the alignment by double-checking for misalignment or strained edges around the cap and the pipe.
Testing the Seal
Once you install the plastic seal cap, testing will confirm a leak-proof fit. This involves introducing controlled water pressure into the connected pipe system to monitor signs of leakage or uneven flow.
Observe the installation area closely during testing. If water escapes the sealed area, re-check the placement or consider replacing the seal cap. Minor adjustments can help you correct most issues in this stage, but bring along extra sizes just in case the measurements require a looser or tighter fit.
Revisit the cap’s position after the test, tightening it manually if you notice minor movement. By doing this, you prolong the lifespan and reliability of the pipe’s seal. You can finish off your project successfully and confidently by knowing your caps are securely in place.
Maintenance Tips for Long-Term Performance
Maintenance extends the durability of the seal. As you leave your plumbing service job, suggest routine maintenance to the property owner in order to promote sealing efficiency and minimal wear.
Periodic Inspections
Schedule regular inspections to verify the continued fit and stability of your plastic seal caps. Distance from routine wear or unexpected discoloration could signal potential risks requiring replacements. Complete routine maintenance on the system to prevent severe repairs down the line.
How To Fix Common Issues
If cracks, warping, or looseness in the plastic seal cap occur, replace the cap immediately to maintain the system’s integrity. Always keep extra seal caps available for unforeseen repair requirements.
If you’re looking for reliable seal caps for your business or home renovation project, get in touch with our team at Polymer Molding. We supply all kinds of seal caps for plumbing and electrical connector protectors to preserve the structural integrity of your installation and products. For more information, browse our selection of plastic molded seals today!
